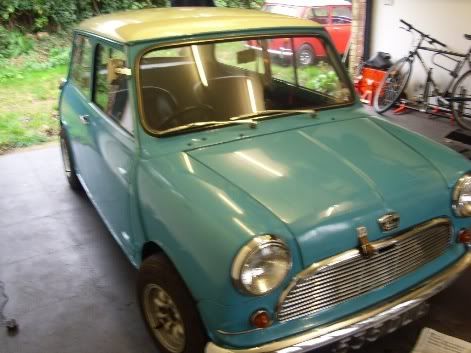
1963 Super Deluxe Project
- Pete
- 1275 Cooper S
- Posts: 11080
- Joined: Fri Jun 25, 2010 10:47 pm
- Has thanked: 15 times
- Been thanked: 38 times
Re: 1963 Super Deluxe Project
"Have you been buying again Peter ?"
No it's a car I've had for quite a while, bought it for the engine it had in it, RH tank etc which'll be going in the Hornet so will be selling soon as I've nowhere to put it.
Sorry for the thread swerve !
No it's a car I've had for quite a while, bought it for the engine it had in it, RH tank etc which'll be going in the Hornet so will be selling soon as I've nowhere to put it.
Sorry for the thread swerve !
- IAIN
- 1275 Cooper S
- Posts: 1090
- Joined: Thu Jun 24, 2010 3:40 pm
- Location: Scotland
Re: 1963 Super Deluxe Project
Thats a great project car you have. very original.
If you are keen on the original detail, don't loose the boby number thats on the front panel.
The way I remove them is by cutting off the area with the plate on, then use an angle grinder from the rear to grind through the spot welds, and it will come off intact ready to re spotweld on.
As said already, watch the door fit those inner a panels are not the best for fit.
- NotNormal
- 850 Super
- Posts: 246
- Joined: Thu Nov 18, 2010 12:57 pm
- Location: Surrey
- Contact:
Re: 1963 Super Deluxe Project
Well due to snow and impending crimbo stuff i've not had a chance to pop down to the workshop to play with the Mini myself but Dad's been cracking on with it so managed to get a few pics of its current state this weekend.
First off the passenger side sill has been welded in place
At the rear there is still some replacement panel work to be added after the rot was chopped out
And here's the front A pillar work, outer panel has been tacked in place but still needs final welding and finishing
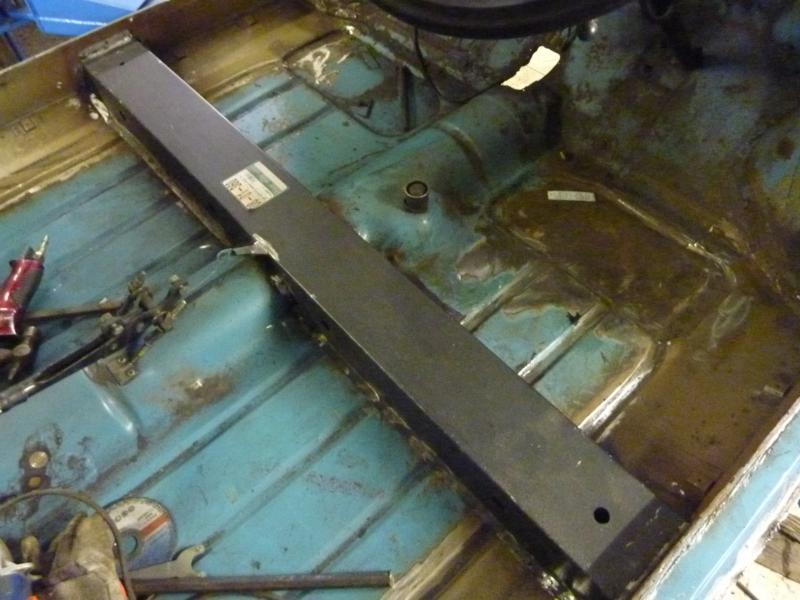
Next up is the central box section, this was removed as the seat base fixing points had a number of issues such as replacement patches welded on over stripped threads and one area had ripped away due to the seat pivot action I expect. It was decided to chop out the whole section and replace with a nice new panel.
Here you can see the drivers side sill has been removed ready for its replacement section.
..from below..
...and at the front. Still a bit more welding and finishing to do in the arch itself including the outer A panel as well.
So thats as it is now, doors have been checked throughout to ensure everything is all straight and true and its looking all good so far from what I gather.
Not sure i'll be able to get any updates until the new year now but we'll see how time goes.
Have a good Christmas everyone
-
- 1275 Cooper S
- Posts: 2109
- Joined: Thu Jun 24, 2010 7:47 pm
Re: 1963 Super Deluxe Project
looks good, your old man is really cracking on!
when he fits the crossmember, make sure he supports the shell across its entire length (in line with the crossmember - with no crossmember fitted the floor can 'belly down' quite a lot and the new cross member will bend down to suit the floor if you simply weld it in.
the sill sections are a nice thing to use though, arnt they?
please note, these are my own, individual sales, nothing whatsoever to do with my employer, minispares
-
- Site Admin
- Posts: 19842
- Joined: Thu Jun 24, 2010 11:30 am
- Location: Away with the Faries
- Has thanked: 2 times
- Been thanked: 5 times
Re: 1963 Super Deluxe Project
Hi Notnormal,
You look like you are making excellent progress.
Have an excellent crimbo & I look forward to watching your progress in the new year.
You look like you are making excellent progress.
Have an excellent crimbo & I look forward to watching your progress in the new year.
- NotNormal
- 850 Super
- Posts: 246
- Joined: Thu Nov 18, 2010 12:57 pm
- Location: Surrey
- Contact:
Re: 1963 Super Deluxe Project
Cheers guys, Dad did comment that the sills were very good product indeed.guru_1071 wrote:looks good, your old man is really cracking on!
when he fits the crossmember, make sure he supports the shell across its entire length (in line with the crossmember - with no crossmember fitted the floor can 'belly down' quite a lot and the new cross member will bend down to suit the floor if you simply weld it in.
the sill sections are a nice thing to use though, arnt they?
I know what your saying about the floor, I was surprised at actually how flimsy it is even with the brace . There was some "belly down" already before we started on the car in the areas under the back of the rear seats (which i'm not sure if this is normal). He said that he's already pushed most of the floor back up to its flat state so should be a lot better than before once finally welded.
On another note I popped round Dad's the other week and we found some pictures of both himself and his sister in the car with L plates on as they both learnt to drive in it. He's since said that he found a picture of my Grandfather's previous 59 in speedwell blue so i'll try and get that as well. I'm planning on scanning them in over the crimbo period so will post up.
- NotNormal
- 850 Super
- Posts: 246
- Joined: Thu Nov 18, 2010 12:57 pm
- Location: Surrey
- Contact:
Re: 1963 Super Deluxe Project
Hope everyone had a good Crristmas and New Year. Seems like its all passed by extremely quickly and now back to normality.
So for a new year update here's some pics of the car in question from back in the mid 60's. The first four are when my fathers sister (my auntie) used the Mini to learn to drive in.
Dad's sister posing with 'L' plates
My father in his earlier years also with the car....
.....and his motorbike which he used at the time
My father a bit older now (late 60's) when he used the Mini to also learn to drive in
Still on the hunt for more pics so we'll see what turns up.
In regards to the restoration when I saw Dad over the crimbo period he said that the other sill has now been welded in so as soon as I can get back to his workshop to do some more on the car i'll get some more pics of progress.
-
- Site Admin
- Posts: 19842
- Joined: Thu Jun 24, 2010 11:30 am
- Location: Away with the Faries
- Has thanked: 2 times
- Been thanked: 5 times
Re: 1963 Super Deluxe Project
What a brilliant selection of pictures. All really reminiscent of their period & a superb addition to your cars family history. Its little additions like this that make projects like this one something more than the usual.
- NotNormal
- 850 Super
- Posts: 246
- Joined: Thu Nov 18, 2010 12:57 pm
- Location: Surrey
- Contact:
Re: 1963 Super Deluxe Project
Few more updates as I managed to spend some more time down the workshop at the weekend, so able to get some more pics of current progress.
Drivers side sill has been welded in, still a bit of cleaning to do on the underside.
New crossmember has been finalised (you'll also notice the small whitish rectangular plate in the drivers footwel is the numerical stamp plate which still has to welded back in the correct position on the floor.)
Close up of the join area's on the floor, as you can see its been done right on the floor ridge edges to try and make it invisible
Both A pannels have been done (still yet to be flat sanded for finish but thats to be done nearer bodyshop stage)
Next up is to work on the rear arches so here's one side before work starts...
... and the other being done. Although rear subframe removal is probably next on the list for easier access.
And here's a pic showing its current state (although not quite true as a removed the qtr windows and some underside parts before I left for the day).
-
- 1275 Cooper S
- Posts: 2109
- Joined: Thu Jun 24, 2010 7:47 pm
Re: 1963 Super Deluxe Project
looking good!
i looked at mine yesterday and thought 'christ, ive still got the drivers side to do.....'
please note, these are my own, individual sales, nothing whatsoever to do with my employer, minispares
- NotNormal
- 850 Super
- Posts: 246
- Joined: Thu Nov 18, 2010 12:57 pm
- Location: Surrey
- Contact:
Re: 1963 Super Deluxe Project
Monday morning so here's a few more pics of current progress
Everything to date body wise was stripped back, seam sealer added and then prepped ready for a coat of rust protection.
So Saturdays job was to apply a coat or POR15 which was added as a base rust protection and the fact its sets rock hard should help out in the long term.
Spent all day yesterday cleaning the engine but didn't have my camera so no pics i'm afraid. On that note I will need to ask a few questions about colours of that aswell so expect a thread on the forum coming up...
Re: 1963 Super Deluxe Project
That's coming along just fine. I thought for one moment you were painting the car black until I read the text.
I guess your car was registered later in '63 judging by the plastic window catches.
- NotNormal
- 850 Super
- Posts: 246
- Joined: Thu Nov 18, 2010 12:57 pm
- Location: Surrey
- Contact:
Re: 1963 Super Deluxe Project
Cheers, personally i'm not aware of when they changed the window switches so would be nice to know for info, but yes this car was first registered on the 23/07/1963.
Re: 1963 Super Deluxe Project
My Austin was built on 30th April 1963 so that narrows it down to some where in May, June or July.
- NotNormal
- 850 Super
- Posts: 246
- Joined: Thu Nov 18, 2010 12:57 pm
- Location: Surrey
- Contact:
Re: 1963 Super Deluxe Project
Well its about time I added some updates to this thread especially as we've still been cracking on with the project. So to bring you guys up to date here's what’s been going on.
First off the underside rear end of the car was to be addressed
When taking the subframe off unfortunately the rust has gone too far to re-use again as this is the state of it on both sides. So replacement has been sourced.
Then there was some further rust that required some chopping of the floor on both sides
These areas were then plated over.
So with the floor looking in good shape it was time for some protection....
..so as with the rest of the floor a coat of POR15 was applied for rust protection in the future.
Rear arches have been addressed
This is where work is still on-going and at the rear end of the car including fitting the new rear valence and joining existing seams.
In addition to the bodywork the engine has had some attention. As mentioned earlier in the thread the cylinder head was sent off for unleaded seats and this has been returned and re-built.
So with the bottom end of the engine, first off all the ancillary parts were removed and all the old paint was stripped off the surfaces as can be seen below.
Once this was done the clutch was removed and checked and there’s loads of life left in it so that was re-instated. Also new timing chain was added.
All the ancillary parts were stripped down to bare metal and then re-painted.
Then the engine was painted with a zinc based primer before the top coat was applied. (note the rear breather was removed and replaced with a blank plate as the engine number dictates)
And this is the current state of the engine. Still a few more bits to add including the badge plates, engine number and thermostat etc but certainly looking a lot better than when it was removed from the car.
So that’s the current state of play but still plenty to be cracking on with
First off the underside rear end of the car was to be addressed
When taking the subframe off unfortunately the rust has gone too far to re-use again as this is the state of it on both sides. So replacement has been sourced.
Then there was some further rust that required some chopping of the floor on both sides
These areas were then plated over.
So with the floor looking in good shape it was time for some protection....
..so as with the rest of the floor a coat of POR15 was applied for rust protection in the future.
Rear arches have been addressed
This is where work is still on-going and at the rear end of the car including fitting the new rear valence and joining existing seams.
In addition to the bodywork the engine has had some attention. As mentioned earlier in the thread the cylinder head was sent off for unleaded seats and this has been returned and re-built.
So with the bottom end of the engine, first off all the ancillary parts were removed and all the old paint was stripped off the surfaces as can be seen below.
Once this was done the clutch was removed and checked and there’s loads of life left in it so that was re-instated. Also new timing chain was added.
All the ancillary parts were stripped down to bare metal and then re-painted.
Then the engine was painted with a zinc based primer before the top coat was applied. (note the rear breather was removed and replaced with a blank plate as the engine number dictates)
And this is the current state of the engine. Still a few more bits to add including the badge plates, engine number and thermostat etc but certainly looking a lot better than when it was removed from the car.
So that’s the current state of play but still plenty to be cracking on with
- Lilihip
- Basic 850
- Posts: 59
- Joined: Sat Jan 01, 2011 5:41 pm
Re: 1963 Super Deluxe Project
Very very nice work congrats! Do you have many reference photos of the engine outside the car? I will be in the same stage in some time so I am wondering.
- coopertim
- 1275 Cooper S
- Posts: 1867
- Joined: Thu Jun 24, 2010 8:45 pm
- Location: In the garage spending far more time and money than my wife agreed to! Lincolnshire UK
- Has thanked: 2 times
- Been thanked: 4 times
- Contact:
Re: 1963 Super Deluxe Project
Fantastic work. Its nice to see a car which is being so nicely restored as a standard mini just because it deserves to be and not because it will be worth a packet afterwards. Not many standard ones left now which makes cars like ours all the more interesting.
Tim
Tim
- Lilihip
- Basic 850
- Posts: 59
- Joined: Sat Jan 01, 2011 5:41 pm
- NotNormal
- 850 Super
- Posts: 246
- Joined: Thu Nov 18, 2010 12:57 pm
- Location: Surrey
- Contact:
Re: 1963 Super Deluxe Project
Cheers for the comments chaps, I keep trawling the web trying to find as many pics of standard cars as possible to try and make sure i'm on the right track in keeping things as they should. Fortunately my Grandfather didn't change much during his lifetime and just kept the car well maintained (he was a mechanical engineer by trade so did all the work on the car himself along with my father). Really can't wait to see the car looking fresh again as I remember it as a child.
The only desicion I struggled making on the engine was the water pump, in the spares I have with the car there are 2 original cast water pumps but we believe these to be maybe faulty as Dad tells me that they used to fail with water leaking past the bearing. The one on the engine is a later item but decided to stick with it as its known to be good and also the water impellors are far more efficient that the the originals. May look at seeing if the originals could be re-built but save that job for later on. Would be interested to hear if anyone knows if this option is a possible....
Note quite sure what you mean but if you want any specific pictures of the engine that could help you by all means let me know.Lilihip wrote:Do you have many reference photos of the engine outside the car?
Last edited by NotNormal on Tue Mar 08, 2011 9:50 am, edited 2 times in total.