'64 Aussie Morris 850

Images & stories about our current projects, cars, engines & all sorts of other stuff.
Post Reply
User avatar
timmy201
1275 Cooper S
Posts: 1894
Joined: Mon Jun 10, 2013 9:57 am
Location: Australia
Been thanked: 2 times

Re: '63 Aussie Morris 850

Post by timmy201 »

So today was the day.. time to get the engine in!
Image

It seemed to go in really nicely this time, I had the car level (when I took the engine out I just had the front jacked up) and I used James' engine lift bracket. There is so much more room down near the diff that the exhaust fits down into place without having to raise up the engine like with the remote style housing
Image

The captive engine mounts were an absolute pain - they just didn't fit into the holes in the subframe. I'd probably recommend fitting them to the car first to check they actually fit, so I ended up wasting a couple of hours messing around with them.
Image

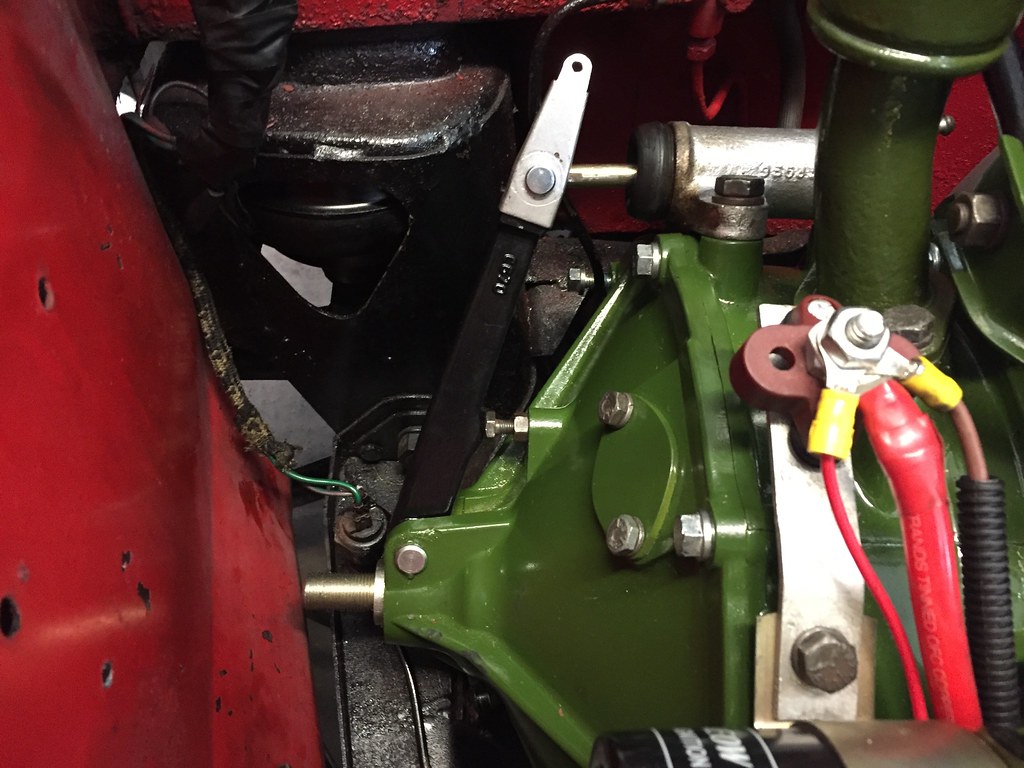
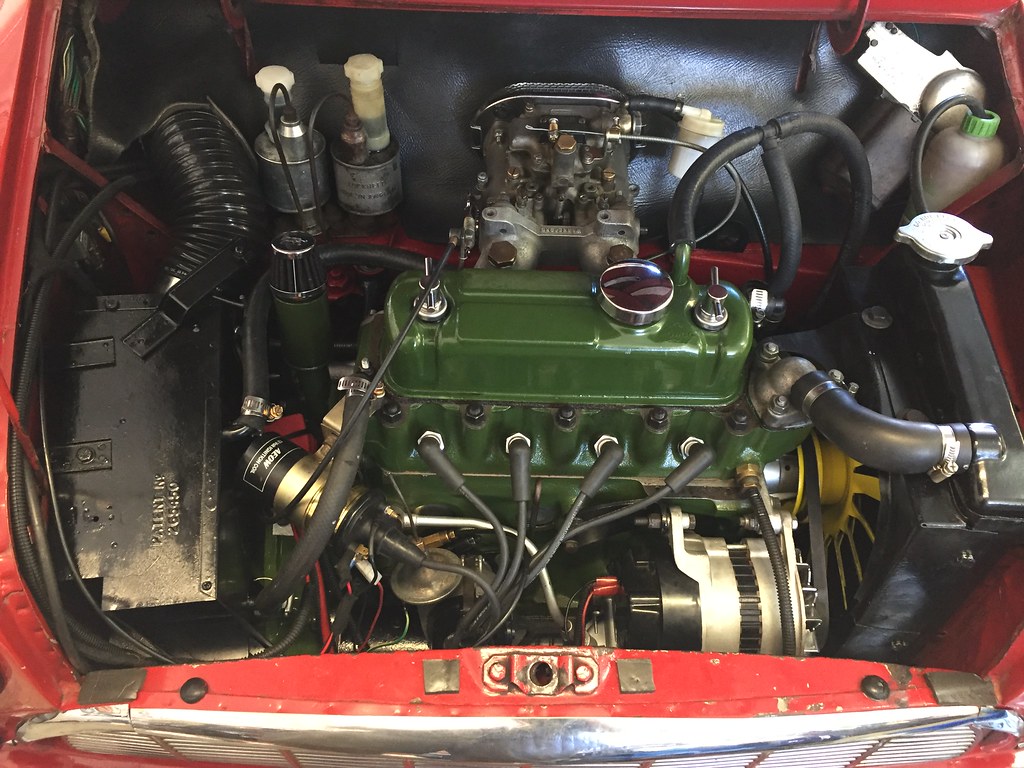
I started bolting up some of the accessories
Image

Underneath the car the exhaust went back on, and to mount the additional engine steadies some holes were drilled in the subframe. You can see the cutout in the floor for the remote shifter which needs to get blanked off
Image

The shifter, boot and old carpet has been installed on the inside. Once I'm finished all the mechanical jobs I'll get the new carpet set fitted
Image

Now I think I'm finished all the jobs under the car it's time to get it back on the ground. I need to remove the old CV joints & driveshafts and then install the pot joints, new driveshafts and CV's. Until then I can't add any oil, but I was able to check the electrical system all works
Image
User avatar
timmy201
1275 Cooper S
Posts: 1894
Joined: Mon Jun 10, 2013 9:57 am
Location: Australia
Been thanked: 2 times

Re: '63 Aussie Morris 850

Post by timmy201 »

So after getting the engine in the clutch didn’t disengage properly. It was running out of stroke in the slave cylinder - this was due to wear in the plunger and clutch arm. I’d used reasonably good condition used parts but there was too much wear to work with this engine.

Changing over the plunger took a couple of hours on Saturday but the outcome was definitely worth it!
Image

The new plunger was sleeved as the new ones can be very soft
Image

The new clutch arm is now installed. The clutch pedal feels fantastic now, it doesn't feel any stiffer than the old setup
Image

It's immediately obvious the improved angle of the clutch arm, and also the reduced amount of clutch pushrod visible
Image

After all day in the garage Saturday we had the first sign of life!
Image

After another long day of car stuff on Sunday with some help from a friend we knocked out most of the remaining jobs. First thing in the morning was checking the base timing, I had the suspicion I'd put the distributor drive in 180 degrees out. I checked it and I think I'm one tooth out as the distributor is rotated all the way to the left. After sorting that out the engine started right up!!
Image

After a couple of little teething problems (loose distributor and then loose throttle linkage) we did a couple of laps around the estate and some uphill pulls under load. It absolutely rips along now, clutch is great, gearbox has 4 synchros which is awesome for me :D (car still needs a wash from Rylstone as you can tell from the windscreen)
Image
User avatar
Peter Laidler
1275 Cooper S
Posts: 6051
Joined: Sat Jul 15, 2017 5:35 pm
Location: Abingdon Oxfordshire
Has thanked: 3 times
Been thanked: 9 times

Re: '63 Aussie Morris 850 - Rebuilt 1098 Running & Driving!

Post by Peter Laidler »

That's a bluddy good idea to bush the clutch plunger. You're right, it just wears with direct metal to metal contact at one single point in the plunger. You can see the wear on the lever ball but not inside the plunger. And a little bit of extra distance in there, at the ball of the lever = a lot of distance at the top of the lever
roger mcnab
998 Cooper
Posts: 568
Joined: Mon Feb 08, 2016 10:19 am

Re: '63 Aussie Morris 850 - Rebuilt 1098 Running & Driving!

Post by roger mcnab »

hi timmy
looks great you have done an excellent job it takes very little to muck up the clutch in minis but a good fix it makes for a feel good relief when it all comes together
happy motoring cheers roger
User avatar
timmy201
1275 Cooper S
Posts: 1894
Joined: Mon Jun 10, 2013 9:57 am
Location: Australia
Been thanked: 2 times

Re: '63 Aussie Morris 850 - Rebuilt 1098 Running & Driving!

Post by timmy201 »

Peter Laidler wrote:That's a bluddy good idea to bush the clutch plunger. You're right, it just wears with direct metal to metal contact at one single point in the plunger. You can see the wear on the lever ball but not inside the plunger. And a little bit of extra distance in there, at the ball of the lever = a lot of distance at the top of the lever
I also think it's a good idea to try and localise the wear into the clutch arm rather than the plunger. It's a much quicker and easier job to replace the arm in the future
roger mcnab wrote:hi timmy
looks great you have done an excellent job it takes very little to muck up the clutch in minis but a good fix it makes for a feel good relief when it all comes together
happy motoring cheers roger
Thanks Roger, the clutch now works really nicely and it's good to know that the system is near the peak of operation now, so any wear can be accounted for in the future.

I spent most of the weekend working on the car, I changed the oil to get rid of the assembly lubricant, retorqued the head and checked all the valve clearances. The rear tappet cover was swapped to a breather type one and both sides had been leaking pretty badly. The cork gaskets just seemed to be the wrong profile. I had one of the rubber/silicone ones from the old engine and it has sealed really well now, so I'll get a new one for the other cover. I also put the bonnet and grille on, now I don't get so many funny looks when I'm driving around :D

I've done about 100km on the road and I'm slowly getting the tune a bit closer to where it should be. In the engine bay I still need to finish the engine breathers and install the heater - it gets in the way of the clutch so I wanted to make sure it was all working fine first.
Image

Image

Image
User avatar
miniminor
1275 Cooper S
Posts: 812
Joined: Thu Sep 27, 2012 6:49 pm
Location: Upside down behind the TV

Re: '63 Aussie Morris 850 - Rebuilt 1098 Running & Driving!

Post by miniminor »

Good work, Its always a relief to get them back in one piece and running. :D
"Get the wheels in line, Get the wheels in line with it! ..... and then slam your brakes on or we'll be in the cabin ! "

1963 Morris Mini Minor Superdeluxe
2014 Freelander 2 SD4
User avatar
timmy201
1275 Cooper S
Posts: 1894
Joined: Mon Jun 10, 2013 9:57 am
Location: Australia
Been thanked: 2 times

Re: '63 Aussie Morris 850 - Rebuilt 1098 Running & Driving!

Post by timmy201 »

miniminor wrote:Good work, Its always a relief to get them back in one piece and running. :D
Thanks, it’s an even bigger relief when it’s your first mini engine rebuild and you hope everything has been done properly!

I was at my parents house a few weeks ago and dad still had these floor mats in the garage. They were too good to throw away and he'd bought them back in the 80's for this very car! They'd also been in every car we had when I was growing up, so I gave them a clean up and they've gone back into the mini
Image

I went out to a car show at the Motorlife museum in Sunday, there was a nice selection of cars and a couple of minis.
Image

Image

Image

I also bought a Moto Lita leather wheel. It was a bargain on ebay ($41) and the seller said it'd come off his ex works Renault R12 rally car. The steering wheel boss I bought a few years ago for the 6 bolt Mountney wheel was also drilled for 9 bolts for a Moto Lita so it went straight on.
Image

It has an extra layer of leather around the outside of the rim and the seller told me it'd been on since he bought the car. So possibly underneath it's mint condition, or needs a retrim... either way it has a nice look and feel :D
Image
Gary Schulz
1275 Cooper S
Posts: 1024
Joined: Wed Dec 10, 2014 8:06 pm
Location: Chicago, IL

Re: '63 Aussie Morris 850 - Rebuilt 1098 Running & Driving!

Post by Gary Schulz »

Timmy,

What was sleeved on the plunger? I am not sure if I see what is different in the picture of the plunger above...

Always good to eliminate any play in this area so I am interested in more detail on what was done.
User avatar
Peter Laidler
1275 Cooper S
Posts: 6051
Joined: Sat Jul 15, 2017 5:35 pm
Location: Abingdon Oxfordshire
Has thanked: 3 times
Been thanked: 9 times

Re: '63 Aussie Morris 850 - Rebuilt 1098 Running & Driving!

Post by Peter Laidler »

Yep....., what about a tech write-up Tim, I'm interested too for the same reason as Gary

Pete the Pom
User avatar
miniminor
1275 Cooper S
Posts: 812
Joined: Thu Sep 27, 2012 6:49 pm
Location: Upside down behind the TV

Re: '63 Aussie Morris 850 - Rebuilt 1098 Running & Driving!

Post by miniminor »

Whats the story with the indicator stalk? Nice wheel!
"Get the wheels in line, Get the wheels in line with it! ..... and then slam your brakes on or we'll be in the cabin ! "

1963 Morris Mini Minor Superdeluxe
2014 Freelander 2 SD4
User avatar
timmy201
1275 Cooper S
Posts: 1894
Joined: Mon Jun 10, 2013 9:57 am
Location: Australia
Been thanked: 2 times

Re: '63 Aussie Morris 850 - Rebuilt 1098 Running & Driving!

Post by timmy201 »

Gary Schulz wrote:Timmy,

What was sleeved on the plunger? I am not sure if I see what is different in the picture of the plunger above...

Always good to eliminate any play in this area so I am interested in more detail on what was done.
Hi Gary,

I've circled the hardened bush here. Basically the new plunger is drilled out (not all the way through), new bush pressed in (hardened silver steel in this case). Obviously the new bush needs to be the right ID to match the ball on the clutch arm. The other little trick was a washer between the plunger and thrust bearing, it just gives that little bit more room for wear. You just need to make sure there is still free play and the bearing won't be resting on the diaphragm.

I'll see if the guy who did the bush (drmini in aust) has any further photos or details as he might like to do a write up of the process.
48768116223_4669294767_b.jpg
Peter Laidler wrote:Yep....., what about a tech write-up Tim, I'm interested too for the same reason as Gary

Pete the Pom
See above ;)
miniminor wrote:Whats the story with the indicator stalk? Nice wheel!
It's another one of the parts that my grandpa fixed over the years. Buying another indicator stalk is pretty expensive and this one is the original and still works anyway. I can't bring myself to change it now that he's gone. I'll have the first chance to drive with the new wheel this weekend so I'll get to see how it feels when driving
You do not have the required permissions to view the files attached to this post.
Gary Schulz
1275 Cooper S
Posts: 1024
Joined: Wed Dec 10, 2014 8:06 pm
Location: Chicago, IL

Re: '63 Aussie Morris 850 - Rebuilt 1098 Running & Driving!

Post by Gary Schulz »

Thanks Timmy,

Now I see what you were referring to. Makes sense to toughen up those surfaces to make things more durable...
User avatar
timmy201
1275 Cooper S
Posts: 1894
Joined: Mon Jun 10, 2013 9:57 am
Location: Australia
Been thanked: 2 times

Re: '63 Aussie Morris 850 - Rebuilt 1098 Running & Driving!

Post by timmy201 »

A huge day in the garage yesterday - the old red carpet was removed
Image

The new carpet kit came from TST on ebay (Australian made) and was under $150 delivered. It is a moulded carpet and has a pretty good fit. It did come rolled up in a bag, so it will need a little bit of time to flatten out.
Image

After about 5 hours of test fitting, trimming, installing clips and putting everything back in again it looks pretty good. The wheel arch trims are yet to be glued on
Image

The next big job on the list is to retrim the front seats
Image
User avatar
timmy201
1275 Cooper S
Posts: 1894
Joined: Mon Jun 10, 2013 9:57 am
Location: Australia
Been thanked: 2 times

Re: '63 Aussie Morris 850 - Rebuilt 1098 Running & Driving!

Post by timmy201 »

I have started stripping down the front seats ready to be refurbished as they are pretty uncomfortable. The back portion of the seat didn't have any support and it was starting to tear the vinyl of the seat. When I removed the cover the old elastic webbing was completely shot, and had stretched and then set hard. I'll need to get some new webbing and foam to redo the back of the seat, the base of the seats will need some new foam and I've got the NOS vinyl covers I got last year so I'll finally have matching trim through the car.
Image

I had a couple of hours free last week and it was +35 degrees outside so I found an inside job. I bought this Maxrob steering wheel a few years ago and it was obviously very cheap due to the condition, but seeing as it was a period Australian made wheel with a mini boss I thought it was worth buying..
Image
 
I managed to find the right screws to hold on the horn ring and gave it a quick polish. 
Image
 
It was tricky to find a 13" cover and I ended up finding this one at a local shop.
Image
 
It took 3 hours this morning to stitch it on, it's not perfect but it's definitely useable now. 
Image

The heater has now been reinstalled and I've added coolant and drained all the water out. I took it to work today and the temp gauge sat right on 80 degrees the whole drive. The change to the throttle cable has made it a bit more sensitive at the start of the pedal travel, so it's very easy now to give it too much and spin the tyres taking off the line..
Image

An advanced apology, Flickr wants at least US$50 a year for me to keep my photo library live and I’d rather spend that money on other things. I’ll try and update the posts to reupload the photos but it’s a huge amount of work so it might take a while...
1071 S
1275 Cooper S
Posts: 916
Joined: Sun Jun 27, 2010 8:44 am
Location: Southern Tablelands (Oz)

Re: '63 Aussie Morris 850 - Rebuilt 1098 Running & Driving!

Post by 1071 S »

Just one little issue you might fix... A hundred (or so 8-) years ago my 850 burst into flames half way up Kangaroo Valley as the sharp edge on the front right hand corner of the heater (see the little square cut out in the bottom left of your photo) cut through the loom and it all went up in smoke....and flame..... I have one of those heaters in the shed and that edge is still razor sharp. I would suggest a little strip of plastic edging to keep the wiring safe.

The Ladies didn't appreciate their ball gowns being thrown on the road as I frantically scrabbled to remove the battery lead.... The Mossvale NRMA guy did a superb job splicing all manner of spare bits of wire into the loom. So good, in fact, that the repair was still there when I sold the car years later...

Cheers, Ian
User avatar
timmy201
1275 Cooper S
Posts: 1894
Joined: Mon Jun 10, 2013 9:57 am
Location: Australia
Been thanked: 2 times

Re: '63 Aussie Morris 850 - Rebuilt 1098 Running & Driving!

Post by timmy201 »

1071 S wrote:Just one little issue you might fix... A hundred (or so 8-) years ago my 850 burst into flames half way up Kangaroo Valley as the sharp edge on the front right hand corner of the heater (see the little square cut out in the bottom left of your photo) cut through the loom and it all went up in smoke....and flame..... I have one of those heaters in the shed and that edge is still razor sharp. I would suggest a little strip of plastic edging to keep the wiring safe.

The Ladies didn't appreciate their ball gowns being thrown on the road as I frantically scrabbled to remove the battery lead.... The Mossvale NRMA guy did a superb job splicing all manner of spare bits of wire into the loom. So good, in fact, that the repair was still there when I sold the car years later...

Cheers, Ian
Thanks Ian. Normally I have a split rubber hose all the way around the sharp edge but I’ve forgotten to put it back on the other day. I’ll remember to put it on now! The wiring loom there is also covered in plastic conduit to prevent any issues.
roger mcnab
998 Cooper
Posts: 568
Joined: Mon Feb 08, 2016 10:19 am

Re: '63 Aussie Morris 850 - Rebuilt 1098 Running & Driving!

Post by roger mcnab »

hi timmy
its looking good makes me feel lazy that my mini is languishing in the shed and longing to get out but it needs to be patient as the fly wheel is finished just needs to be paid for then the diff gears need to be paid for then the rebore then the little bit of rust and painting etc
also some slow progress on the unipower gt project cutting ribs to make body plug i hunted all over the net for headlight rims for the 5.75 headlights no luck then i :idea: :idea: moment and the postie hondas have that size rim solved
your mk1 looks great a lot better than mine all those years ago red with white roof and jelly bean mags looked ok but needed serious engine work and getting rid of the magic wand was the best thing i did to it much better
well keep up the good work cheers roger mcnab
User avatar
timmy201
1275 Cooper S
Posts: 1894
Joined: Mon Jun 10, 2013 9:57 am
Location: Australia
Been thanked: 2 times

Re: '63 Aussie Morris 850 - Rebuilt 1098 Running & Driving!

Post by timmy201 »

So a couple of weeks ago I needed to take a ladder down to my parents place. It was also a really nice sunny day so I decided to pop on the roof racks and take the mini
ImageAll Photos-1819 by timmy.beazley, on Flickr
This turned out to be a very long trip as the car stalled when going through town and wouldn't restart. I narrowed down the fault to the blackbox ignition unit as the light wasn't coming on to indicate it was running. I bypassed the unit and it started up fine, so I limped the car to my parents place until I came up with a solution. A mini friend still had his old unit spare so I bought it from him and loaded in a new curve to suit my engine.
ImageAll Photos-1849 by timmy.beazley, on Flickr
A few days later I was able to go back and collect the car, for the drive home I took an old windsurfing board which is destined for display in my garage. I certainly got a few looks driving around with it on!
ImageAll Photos-1882 by timmy.beazley, on Flickr
Last weekend we had one of my favourite MITG drives through the Southern Highlands. It's strange but really nice to have so much more power than before that I can now accelerate up hills!
ImageAll Photos-1890 by timmy.beazley, on Flickr

ImageAll Photos-1891 by timmy.beazley, on Flickr
Trevor generously gave me a gear lever extension, a nice period accessory and it brings the gear knob a little higher and further back, which is a bit more comfortable while driving.
ImageAll Photos-1893 by timmy.beazley, on Flickr
One of the last jobs to do was redo the front seats. The old elastic webbing was certainly past it's best and had stretched and solidified.
ImageAll Photos-1918 by timmy.beazley, on Flickr
I bought a roll of new style webbing from a local upholstery shop and redid both the front seats. The seats now are plump and don't sag back into the frame. They are much more comfortable and I'm looking forward to using them again.
ImageAll Photos-1912 by timmy.beazley, on Flickr
One strange thing about the Aussie seats brackets is that the further back the seat, the higher it makes the mounting point. I bought a pair of the UK style brackets which have all the holes horizontally, this keeps the seat at the same angle. So far it seems to be a nice driving position.
ImageAll Photos-1931 by timmy.beazley, on Flickr
The seat trims were added on and the interior is nearly done!
ImageAll Photos-1933 by timmy.beazley, on Flickr

ImageAll Photos-1936 by timmy.beazley, on Flickr

ImageAll Photos-1938 by timmy.beazley, on Flickr
roger mcnab
998 Cooper
Posts: 568
Joined: Mon Feb 08, 2016 10:19 am

Re: '63 Aussie Morris 850 - Rebuilt 1098 Running & Driving!

Post by roger mcnab »

hi timmy 201
car is looking great my father had a early mini van and had the magic wand gear lever which was a sloppy fit and could be lifted out which was his anti theft device
one night while driving home from work he had to stop at a red light in the valley in brisbane not a good place to stop a group of louts came and were trying to tip it over so he shoved the door open and with the gear lever started to belt into them leaving 2 unconcious and chased the rest down the street he said a few would have had sore ribs and that was the end mini safely home no idea what became of it
cheers roger
User avatar
timmy201
1275 Cooper S
Posts: 1894
Joined: Mon Jun 10, 2013 9:57 am
Location: Australia
Been thanked: 2 times

Re: '63 Aussie Morris 850 - Rebuilt 1098 Running & Driving!

Post by timmy201 »

Funny story Roger :)
Post Reply