1965 Canadian Austin 850 Restoration (again)

Images & stories about our current projects, cars, engines & all sorts of other stuff.
formulaphoto
Basic 850
Posts: 95
Joined: Sun Jul 04, 2010 5:28 am
Location: BC, Canada

Re: 1965 Canadian Austin 850 Restoration (again)

Post by formulaphoto »

Here's an interesting exercise in self-motivation! Before and after pics of the engine bay. A good reminder of why I put myself through this ;)

A year and a half of progress (before pic was taken Nov 2009)!

Image
Warwick
Classic Car Adventures
Classic Car Tours & Rallies in Canada
http://www.classiccaradventures.com
formulaphoto
Basic 850
Posts: 95
Joined: Sun Jul 04, 2010 5:28 am
Location: BC, Canada

Re: 1965 Canadian Austin 850 Restoration (again)

Post by formulaphoto »

Alrighty...my last post was in.....MARCH??!!!!!

Oh my oh my....

Well, 2011 has been incredibly busy for me, and I haven't been home much to work on the Mini. I *NEED* to get back on the horse and finish this thing!

Hope to be posting more updates soon...

Anyone looking for Powder Blue Mk1 seat covers? I need to sell mine (installed only...never used) in order to get the Cumulus Grey versions (oops).

W
Warwick
Classic Car Adventures
Classic Car Tours & Rallies in Canada
http://www.classiccaradventures.com
formulaphoto
Basic 850
Posts: 95
Joined: Sun Jul 04, 2010 5:28 am
Location: BC, Canada

Re: 1965 Canadian Austin 850 Restoration (again)

Post by formulaphoto »

It feels good to be back in the garage again after pretty much no action in the past 8 months - work took off and I've barely be home!

My first step was to get the new motor from my engine builder - a warmed over 1275, port & polished, cam, etc. Just spent the night transferring over parts from the old 850 motor to complete the assembly, and masking up the motor for paint. Here's some photos and commentary.

Note: Some of these photos will probably seem pretty boring to anyone who has restored or spent much time around a Mini. However, this is my first go and I'm learning lots...I figure there are lots of other Mini "newbies" who could learn from the more basic photos as well as the advanced. Heck, there have been MANY times when I didn't know where to locate basic engine parts on my car! Thankfully, restoring a car is the best way to learn ALL of this!

A few items I had to transfer over from the 850 motor include:
- fuel pump blanking plate including the studs out of the old block (small greenish plate in the lower part of the block)
- thermostat housing and thermostat
- oil filter housing & pipes, including studs out of the old block
- starter
- oil pressure sensor
- some sort of drain tap on the back (oil drain?)
- heater valve
- various brackets

Motor all ready for the paint shop.
Image

Springs and things
Image

Thermostat from the 850 - can anyone tell me what temp rating this has?
Image
Image

Thermostat housing from the 850
Image

Front of the motor, with old cartridge oil filter housing and pipes attached
Image

Doh! Original radiator bracket won't fit the new head...the studs are in a different position. New one has been ordered.
Image

When I pulled the starter out of my 850 engine, I found the spring broken (how did that happen? Is it common?). It was still functioning fine, but I'll replace the spring. I have a spare starter (which doesn't spin very freely) that I'll harvest for parts.
Image

The spare starter has a slightly thicker spring... What's the trick to getting the spring compressed to get at the little c-clip?
Image

Identifying markings for the block - 12G1279 (A series 1275)
Image
Warwick
Classic Car Adventures
Classic Car Tours & Rallies in Canada
http://www.classiccaradventures.com
coop12g295
998 Cooper
Posts: 693
Joined: Thu Jun 24, 2010 4:31 pm
Location: Portsmouth Hants

Re: 1965 Canadian Austin 850 Restoration (again)

Post by coop12g295 »

You need a starter motor spring compressor,used to be readily available,
even had them on the shelf at the accessory shop I used to manage in
1980/81
formulaphoto
Basic 850
Posts: 95
Joined: Sun Jul 04, 2010 5:28 am
Location: BC, Canada

Re: 1965 Canadian Austin 850 Restoration (again)

Post by formulaphoto »

Finally some time at home and I've spent the last couple days in the garage working on the Mini again. Momentum is building! I hope to have the motor in the car by the end of tomorrow.

I decided to take two steps back before moving forward today, by removing the 5/16" fuel line I had installed previously and putting 1/4" back in. The 5/16" was overkill, and together with the hydrolastic pipes they weren't fitting within the metal tabs under the car very securely. Dropping the subframes and steering rack also reminded me of a few things I need to work on related to subframe alignment too.

Engine is painted and I've been bolting the accessories to it. With the subframes back on, I plan on installing the brake hard lines to the front subframe and then installing the engine tomorrow if all goes to plan!
Image
Image

I was going to powdercoat and refurbish the fuel tank but decided to cut my losses and keep moving forward, so I just get it painted with POR-15. Looks good enough for me!
Image

Hopefully will have new updates every day for the next few weeks while I get this car finished! We have our annual Spring Thaw Classic driving tour on April 27th-29th, and this HAS to be finished before then or else!

W
Warwick
Classic Car Adventures
Classic Car Tours & Rallies in Canada
http://www.classiccaradventures.com
georgek
850 Super
Posts: 223
Joined: Sun Oct 09, 2011 3:56 pm

Re: 1965 Canadian Austin 850 Restoration (again)

Post by georgek »

Nice work. looking good. :)
formulaphoto
Basic 850
Posts: 95
Joined: Sun Jul 04, 2010 5:28 am
Location: BC, Canada

Re: 1965 Canadian Austin 850 Restoration (again)

Post by formulaphoto »

A little closer to installing the motor...only a couple more little to-do's to tick off the list. I thought I was closer than I was! So many little details to get right!

Original Mk1 steering rack re-installed. I'm not sure what function the plastic shims under the u-bolt have, but I fashioned a couple of my own from some sheet urethane.
Image
Image

Front subframe re-installed (after dropping it yesterday to re-do the fuel lines). Only have stainless bolts and nuts available at the moment, but I might change them out later for stronger versions.
Image

All set for heart transplant!
Image

Image

Image
Warwick
Classic Car Adventures
Classic Car Tours & Rallies in Canada
http://www.classiccaradventures.com
formulaphoto
Basic 850
Posts: 95
Joined: Sun Jul 04, 2010 5:28 am
Location: BC, Canada

Re: 1965 Canadian Austin 850 Restoration (again)

Post by formulaphoto »

I've been prepping the engine bay and motor for the past couple of days, hoping to install it, and realized that I have two different mounting brackets. Or rather, I have one, but not the other.

Here's the new motor, which has part of the "Cooper" bracket attached, but I don't have the stamped metal portion.
Image

However, my old 850 motor has this larger stamped metal bracket, and I was wondering if I can just remove the square portion from the new motor and swap this over, or if the studs are different? Also, is the Cooper mount the preferred way to go? (Before someone points it out, I do have new rubber mounts to install too!)
Image
Image

Secondly, the replacement headlamp rings I got weren't fitting very well, so I pulled out the old ones and compared them. First, the tabs are too big and won't fit inside the support ring, and also the new ones are shallower. Any advice on the following photos? Should the chrome rings screw up tight to the metal support ring, or is it normal to have some gap?
Image
Image
Image


W
Warwick
Classic Car Adventures
Classic Car Tours & Rallies in Canada
http://www.classiccaradventures.com
Tim
1275 Cooper S
Posts: 1265
Joined: Thu Jun 24, 2010 11:55 pm
Location: Tasmania, Australia
Has thanked: 3 times
Been thanked: 7 times

Re: 1965 Canadian Austin 850 Restoration (again)

Post by Tim »

If you take off the alloy block on the gearbox, you'll find that the studs are too long to fit the pressed metal engine mount. You'll need to fit the shorter studs as well. The alloy style is a lot stronger than the pressed steel ones, which tend to fatigue and crack in the corners.

Tim
1951 Morris Commercial J Type Van
1955 BSA C11G
1961 Morris Mini Traveller
1969 Triumph TR6R
1977 Leyland Moke Californian
JC T ONE
1275 Cooper S
Posts: 3180
Joined: Fri Aug 13, 2010 5:25 am
Location: Denmark

Re: 1965 Canadian Austin 850 Restoration (again)

Post by JC T ONE »

formulaphoto wrote:
Here's the new motor, which has part of the "Cooper" bracket attached, but I don't have the stamped metal portion.

Nothing special "Cooper" about the part you are missing,
they are normal later type Mini, and easy to find.


Here are 2 but if you dont have the long bolts, go for the second one.

http://www.ebay.co.uk/itm/CLASSIC-MINI- ... 19ce7edb31


http://www.ebay.co.uk/itm/CLASSIC-MINI- ... 4cff3544ea
ChrisB
850 Super
Posts: 110
Joined: Sun Aug 14, 2011 9:51 am

Re: 1965 Canadian Austin 850 Restoration (again)

Post by ChrisB »

How come you have put a dirty steering rack and hydro pipes back on??

Paint is beautiful btw, the shine and reflection in the pictures on Page 1 is jaw dropping.
formulaphoto
Basic 850
Posts: 95
Joined: Sun Jul 04, 2010 5:28 am
Location: BC, Canada

Re: 1965 Canadian Austin 850 Restoration (again)

Post by formulaphoto »

ChrisB wrote:How come you have put a dirty steering rack and hydro pipes back on??
Thanks, yeah, the paint is great!

Mainly re-using the old hydro lines and steering rack for budget reasons, and also because I'm racing to meet a deadline of having the car finished by mid-April (in time for an event). The hydro pipes are clean (they just don't look shiny) and the steering rack was working fine when it came off the car so no point spending money where I don't need to (a new steering rack would also mean new steering arms).

W
Warwick
Classic Car Adventures
Classic Car Tours & Rallies in Canada
http://www.classiccaradventures.com
ChrisB
850 Super
Posts: 110
Joined: Sun Aug 14, 2011 9:51 am

Re: 1965 Canadian Austin 850 Restoration (again)

Post by ChrisB »

That's fair enough, currently rushing to finish our Mk2 at the moment - its in primer ATM with 3 weeks left!
formulaphoto
Basic 850
Posts: 95
Joined: Sun Jul 04, 2010 5:28 am
Location: BC, Canada

Re: 1965 Canadian Austin 850 Restoration (again)

Post by formulaphoto »

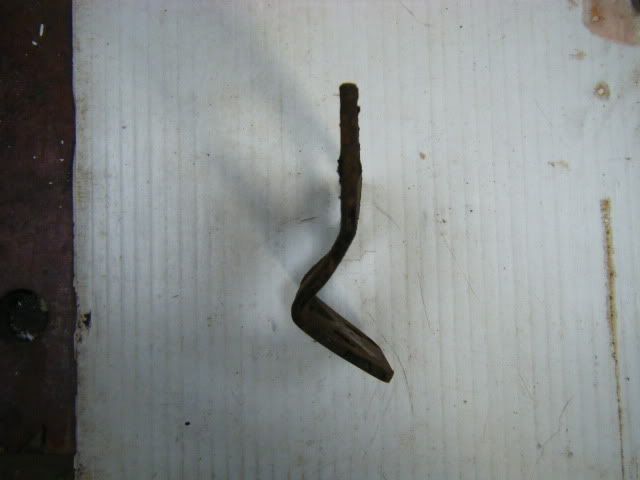
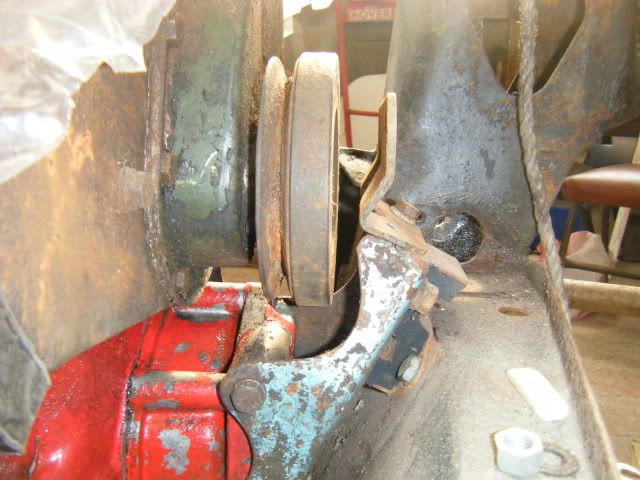
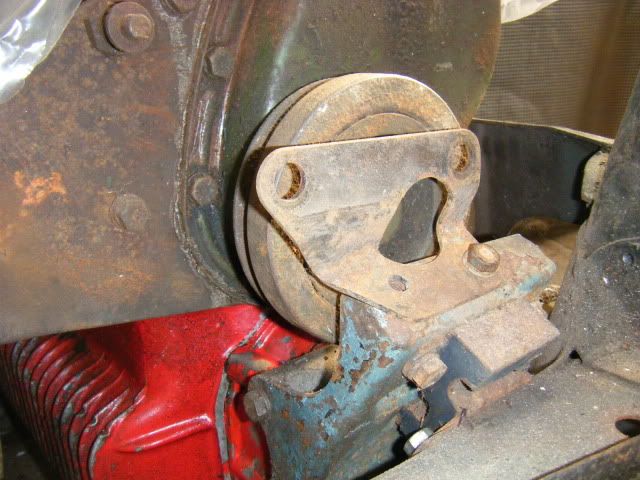
Ok, running up against another snag before getting the motor in. With the new motor comes a thicker crank pulley and new motor mount. I found the motor mount bracket I was missing earlier, but now the old rad bracket sits very close to the pulley. With the bolts in place, I will never be able to pass a belt past the rad bracket. I can modify the bracket holes so it sits further away from the pulley, but do I have enough room/forgiveness to move the rad like that? (ie. closer to the fender)?

Image

Image


Thanks!
W
Warwick
Classic Car Adventures
Classic Car Tours & Rallies in Canada
http://www.classiccaradventures.com
InimiaD
1275 Cooper S
Posts: 1526
Joined: Thu Jul 01, 2010 11:20 pm
Location: West of Offas Dyke.

Re: 1965 Canadian Austin 850 Restoration (again)

Post by InimiaD »

You will need a 12A 293 lower rad bracket, the type fitted to the cooper S if you are using a 2 piece rad cowl.
InimiaD
1275 Cooper S
Posts: 1526
Joined: Thu Jul 01, 2010 11:20 pm
Location: West of Offas Dyke.

Re: 1965 Canadian Austin 850 Restoration (again)

Post by InimiaD »

Some pics of the type of lower bracket you require.
As can be seen, there's a lot more room for the belt.

Image

Image

Image
Steve A
998 Cooper
Posts: 275
Joined: Thu Aug 12, 2010 10:23 pm

Re: 1965 Canadian Austin 850 Restoration (again)

Post by Steve A »

Couldn't the original rad bracket be 'cranked' back like the s one?
JC T ONE
1275 Cooper S
Posts: 3180
Joined: Fri Aug 13, 2010 5:25 am
Location: Denmark

Re: 1965 Canadian Austin 850 Restoration (again)

Post by JC T ONE »

Steve A wrote:Couldn't the original rad bracket be 'cranked' back like the s one?
just cut & weld it, in the correct position.
formulaphoto
Basic 850
Posts: 95
Joined: Sun Jul 04, 2010 5:28 am
Location: BC, Canada

Re: 1965 Canadian Austin 850 Restoration (again)

Post by formulaphoto »

Great day today - finally got the motor back in the car!

Found a quick and easy way to get the motor angled correctly into the car... First, the chain was attached to the clutch servo bolts, and to the outermost dynamo bolt. This gave it a good balanced lift, with a bit of tilt. Then, I wrapped a strap around the differential housing which allowed me to control the tilt while I slowly lowered the motor. Easy as pie!
Image

This has given me a lot of motivation now to keep plugging away at it.
Image

With the help of a friend, we also cut and welded the rad bracket and moved the rad shroud attachment points. It's not pretty (in fact, I hesitate to post it here!), but it works for now. I screwed up in my mental math, which is why it looks so bad (not to mention neither of us are great welders). ;) I will continue to look for the correct used bracket and lower rad shroud and replace it later.
Image
Image

Onwards and upwards!
W
Warwick
Classic Car Adventures
Classic Car Tours & Rallies in Canada
http://www.classiccaradventures.com
formulaphoto
Basic 850
Posts: 95
Joined: Sun Jul 04, 2010 5:28 am
Location: BC, Canada

Re: 1965 Canadian Austin 850 Restoration (again)

Post by formulaphoto »

Another busy day in the garage today. Both Dave and I were plugging away at getting our cars ready for the Spring Thaw rally. I got the motor accessories bolted up and all the wiring plugged into the mini. Dave was sorting out the dry sump pump on his rally Beetle.
Image

I stumbled across a box of spares I had forgotten about and found an 11-blade plastic fan inside. I've heard this is one of the better fans to use, so I'll probably install this instead of the original spot welded fan. Any insight into what fan is actually better to use?
Image

Next I went to install the oval binnacle instead of the single-gauge speedo and found that the holes are different! Doh. I guess I'll be drilling new holes into the firewall? I thought they were swappable.
Image

I also had a dig through the box of my Dad's old parts he brought over when he moved from England, and found this brand new, in-box coil. I've already ordered a new Lucas high output coil, otherwise I'd give this one a whirl!
Image

I'm feeling good now, finally making some progress and I feel like I might actually make my deadline!

W
Warwick
Classic Car Adventures
Classic Car Tours & Rallies in Canada
http://www.classiccaradventures.com
Post Reply