Page 1 of 7
1964 Rust project
Posted: Tue May 02, 2017 12:33 pm
by Frogeye61
I've actually been working on this thing for a while, since August 2016. It's been on the other Mini forum but I figured that the Mk1 crowd needs to see this too.
It started when the son (Tim) of a guy (Peter) at my office bought this very rusted car with a "new inspection" out of Jylland (about 200 km from Copenhagen where we live). He drove the car for a year or more but
rust was a very big problem. After making arrangements with me, because I have several old British cars, the two stripped the Mini down and brought me the shell.

Re: 1964 Rust project
Posted: Tue May 02, 2017 12:49 pm
by Frogeye61
Re: 1964 Rust project
Posted: Tue May 02, 2017 1:45 pm
by Frogeye61
Re: 1964 Rust project
Posted: Tue May 02, 2017 2:22 pm
by Frogeye61
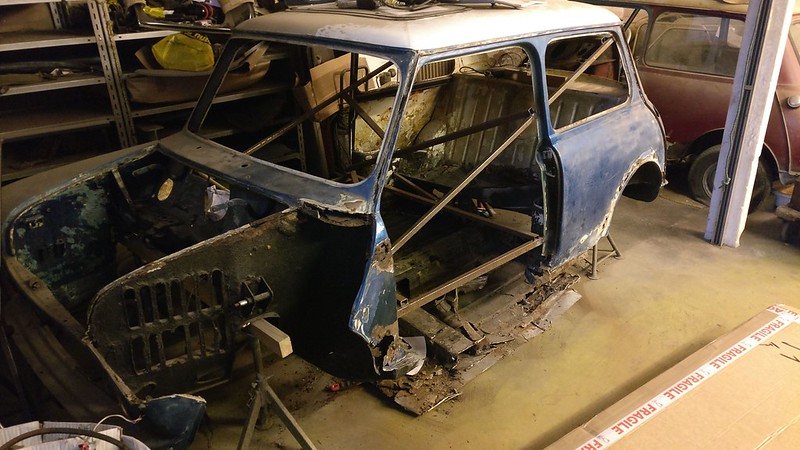
The first thing was to brace the body inside. We hoped it would be good enough to keep everything in line.
The front wing was about to fall off so I hacked it off just to see how bad everything was behind the A panel.
The sunroof necessitated that we change the roof panel also.

Re: 1964 Rust project
Posted: Tue May 02, 2017 2:30 pm
by Frogeye61
Re: 1964 Rust project
Posted: Tue May 02, 2017 2:55 pm
by mk1
Good luck with what looks like a major project. I look forward to following your progress.
Re: 1964 Rust project
Posted: Tue May 02, 2017 7:57 pm
by 2311Jethro
I suddenly feel a lot less daunted by my project! Have fun, it looks like you will be building a real car from just the shadow of the old one. Good stuff.
Re: 1964 Rust project
Posted: Wed May 03, 2017 8:27 am
by Frogeye61
The front floor / foot panel was covered on both sides with an external plate to hold in the
rust. This maybe to show the inspection man that there wasn't any
rust on the outside.

 IMG_20161129_190022s
 by
frogeye61, on Flickr
 IMG_20161129_210334s
 by
frogeye61, on Flickr
Additionally, the seat belts were mounted to the bins with WOOD.

 IMG_20161206_185542s
 by
frogeye61, on Flickr
Re: 1964 Rust project
Posted: Wed May 03, 2017 8:42 am
by Frogeye61
Peter, his son Tim, and I work generally on this "vehicle" every Tuesday evening after work starting around 17:30 until around 22:00. Peter and I are very enthusiastic while Tim, who is also very interested in doing the
project would also like to learn to weld. This is certainly a good place to start
Around early December we positioned the main floor with brackets, though not sure of the exact placement due to the new boot floor not being in place. None of the fixed, known positioning points are available except the bottom of the seat back. The rear seat back will be kept and repaired. This might seem odd, but we needed some way to position the boot floor.
 IMG_20161206_205326s
 by
frogeye61, on Flickr
 IMG_20161213_185444
 by
frogeye61, on Flickr
 IMG_20161213_211541
 by
frogeye61, on Flickr
 IMG_20161213_211550
 by
frogeye61, on Flickr
Braces were added to hold the stiffener frame to the main floor. The rest of the body at this point is held up only by these struts.
 2016-12-18_05-01-46
 by
frogeye61, on Flickr
Re: 1964 Rust project
Posted: Wed May 03, 2017 9:45 am
by Frogeye61
Just before Christmas we had a rather productive day working on the boot floor.
First, off with the rear fenders. (wings for you Brit chaps)
 IMG_20161220_181336
 by
frogeye61, on Flickr
The boot floor is still held by the back panel and seat back.
 IMG_20161220_182334
 by
frogeye61, on Flickr
Once those are cut free the entire boot floor and inner fenders comes out as one unit.
 IMG_20161220_183531
 by
frogeye61, on Flickr
The shell seems a bit empty at the back
 IMG_20161220_190421
 by
frogeye61, on Flickr
The new floor and inner fenders pretty much fit into place with only the seat back to position it. This isn't enough so everything is left to "float" until fixed points can be obtained.
 IMG_20161220_195854
 by
frogeye61, on Flickr
Re: 1964 Rust project
Posted: Wed May 03, 2017 10:36 am
by Frogeye61
The first workday after Christmas Peter was not available so I worked on my own Mini, straightening the A post left over from it's field racer background. The following workdays were used to do the rear panel...
 IMG_20170111_194643
 by
frogeye61, on Flickr
 IMG_20170111_194953
 by
frogeye61, on Flickr
 IMG_20170116_171958
 by
frogeye61, on Flickr
 IMG_20170118_074225
 by
frogeye61, on Flickr
 IMG_20170118_074247
 by
frogeye61, on Flickr
and test fit of the rear fenders.
 IMG_20170118_174502
 by
frogeye61, on Flickr
Re: 1964 Rust project
Posted: Wed May 03, 2017 12:42 pm
by Frogeye61
Around the rear side windows is a lovely mess of
rust. Since this part is not available from M-machine, I just welded all the holes using small pieces of plate where necessary. This also includes the window mounting flange. The replacement fender doesn't contain this flange so a suitable base is maintained to weld the fender to.
 IMG_20170124_222816
 by
frogeye61, on Flickr
 IMG_20170125_211216
 by
frogeye61, on Flickr
The rear fenders are fitted by careful trimming to butt-weld directly to the existing mounting points.
 IMG_20170129_172840
 by
frogeye61, on Flickr
 IMG_20170129_172850
 by
frogeye61, on Flickr
Peter wasn't quite as accurate with the angle grinder, but it worked just fine.
 IMG_20170129_172900
 by
frogeye61, on Flickr
The other side was also given this procedure and by the end of January the back of the exterior sheet metal was nearly ready.
 IMG_20170131_201940
 by
frogeye61, on Flickr
Re: 1964 Rust project
Posted: Wed May 03, 2017 8:41 pm
by Andrew1967
Bloody hell, that is one massive
project. I thought it looked 'reasonable' in the first few pics as well.
Still, this is a really interesting thread as I may (with luck

) be embarking on a similar
project later in the year.
Looking forward to seeing more developments here
Re: 1964 Rust project
Posted: Thu May 04, 2017 9:37 am
by Frogeye61
Thanks, Remember that this is a consolidation of a build I have been working on since August. It isn't really much further along yet, well maybe a bit.
Re: 1964 Rust project
Posted: Thu May 04, 2017 9:57 am
by Frogeye61
Fitting up the rear panels: Rear panel placed as it should be along with fenders and roof as a test fit.
 IMG_20170131_215641
 by
frogeye61, on Flickr
Since I don't yet have the spot welder, the rear panel is pulled off to drill for plug welds.
 IMG_20170221_194702
 by
frogeye61, on Flickr
Then all re-aligned.
 IMG_20170221_195727
 by
frogeye61, on Flickr
Then a whole mass of plug welds
 IMG_20170221_215459
 by
frogeye61, on Flickr
 IMG_20170221_215920
 by
frogeye61, on Flickr
Welding the corners
 IMG_20170223_190600
 by
frogeye61, on Flickr
And then tacking the fender front edge to the original fender edge
 IMG_20170221_215951
 by
frogeye61, on Flickr
Re: 1964 Rust project
Posted: Thu May 04, 2017 10:15 am
by Frogeye61
I saw these pictures on a forum somewhere:


And then I passed by the trash trailer:

So I gathered the other pieces:

and I made this: I know it's a complete waste of time while I have all the other projects going, but I just had to.
Don't get the wrong idea that I cut a perfectly good Mk1 bonnet in half. It was completely trashed with
rust and a big bend right in the middle, covered with no less than a cm of plastic padding.
 IMG_20170223_184028
 by
frogeye61, on Flickr
I may however use that bumper mount strip for my own Mk1
Re: 1964 Rust project
Posted: Thu May 04, 2017 10:22 am
by rolesyboy
With luck????

Andrew1967 wrote:Bloody hell, that is one massive
project. I thought it looked 'reasonable' in the first few pics as well.
Still, this is a really interesting thread as I may (with luck
) be embarking on a similar
project later in the year.
Looking forward to seeing more developments here
Re: 1964 Rust project
Posted: Thu May 04, 2017 10:26 am
by Frogeye61
About this time Tim got to remove spot welds from the windshield frame
 IMG_20170124_213534
 by
frogeye61, on Flickr
 IMG_20170124_222909
 by
frogeye61, on Flickr
And Peter got to cut the top frame. Holes in the roof are for better access
 IMG_20170307_182416
 by
frogeye61, on Flickr
 IMG_20170307_182501
 by
frogeye61, on Flickr
Then off with the frame
 IMG_20170307_191522
 by
frogeye61, on Flickr
 IMG_20170308_071338
 by
frogeye61, on Flickr
Re: 1964 Rust project
Posted: Thu May 04, 2017 11:57 am
by Frogeye61
The rear fenders are finished welding as everything seemed to fit just right.
 IMG_20170305_171820
 by
frogeye61, on Flickr
Spot welds around the rear inner fenders
 IMG_20170304_104942
 by
frogeye61, on Flickr
The firewall is then cleaned up and the sides of the top dash piece.
 IMG_20170315_081058
 by
frogeye61, on Flickr
Welding is needed where someone put a fuse box through the firewall and hacked the rotisserie opening
 IMG_20170315_081105
 by
frogeye61, on Flickr
The edge of both A posts were rotten so re-establishing the edge at the exact same dimensions as original.
 IMG_20170316_190223
 by
frogeye61, on Flickr
 IMG_20170317_070944
 by
frogeye61, on Flickr
On 22 March we took a short (ahem) trip to see Georg Mikkelsen of ÅKM Racing. We bought a 1275 A+ engine and box for my own 64 Mini, as well as Cooper S disk brake kit, and a double skin boot lid in perfect condition. The engine was a gift from Peter as he is using my garage.
 IMG_20170318_153827r
 by
frogeye61, on Flickr
Gerog is known for designing this:
 IMG_20170318_135018
 by
frogeye61, on Flickr
Re: 1964 Rust project
Posted: Thu May 04, 2017 1:28 pm
by Frogeye61
Inside the windshield frame, A posts, and the top of the firewall which would be behind the scuttle panel were painted with epoxy primer. Shame the factory didn't think of this.
 IMG_20170321_201034
 by
frogeye61, on Flickr
 IMG_20170321_201037
 by
frogeye61, on Flickr
 IMG_20170321_201048
 by
frogeye61, on Flickr
I also welded the fuse box hole and fixed the rotisserie hole edges
 IMG_20170322_155805
 by
frogeye61, on Flickr
Finishing the weld comes later